Minnie's Milestones
  • Home
  • Milestones
  • Passions
    • Shabby Chic Decor >
      • Image Transfer Tutorial(s) >
        • Freezer Paper and Ink Jet Printer
        • Citra-Solv Method
        • Chalkboard Transfer
    • Outside Decor
    • Cottage Gardening >
      • Butterfly Santuary
    • Photography
    • Digital Scrapbooking
    • Mixed Media Art
  • Recipes
  • Advertise/Selling
  • Muse
Minnie's Milestones

Oak Hydrangea Leaf

5/29/2014

 
Picture


Oak Hydrangea Leaf

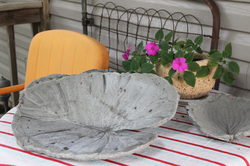
I have been making concrete leaves for many years. I have several throughout my yard used as bird baths, fountains/spitters and garden room décor. I will share those in a later blog. I also give them as gifts to family and friends.

Picture
This is going to be a step by step instructional.

Lately I have had several friends interested in making their own leaves. There are many instructions of different ways to make concrete leaves, but I have found over the fifteen years of making them that mine have stood the test of time. Including ice, snow, heat and grandchildren playing with them.


Picture
Start with a leaf. Big ones are nice but the smaller leaf of the oak hydrangea is my favorite.

Picture
Supplies:
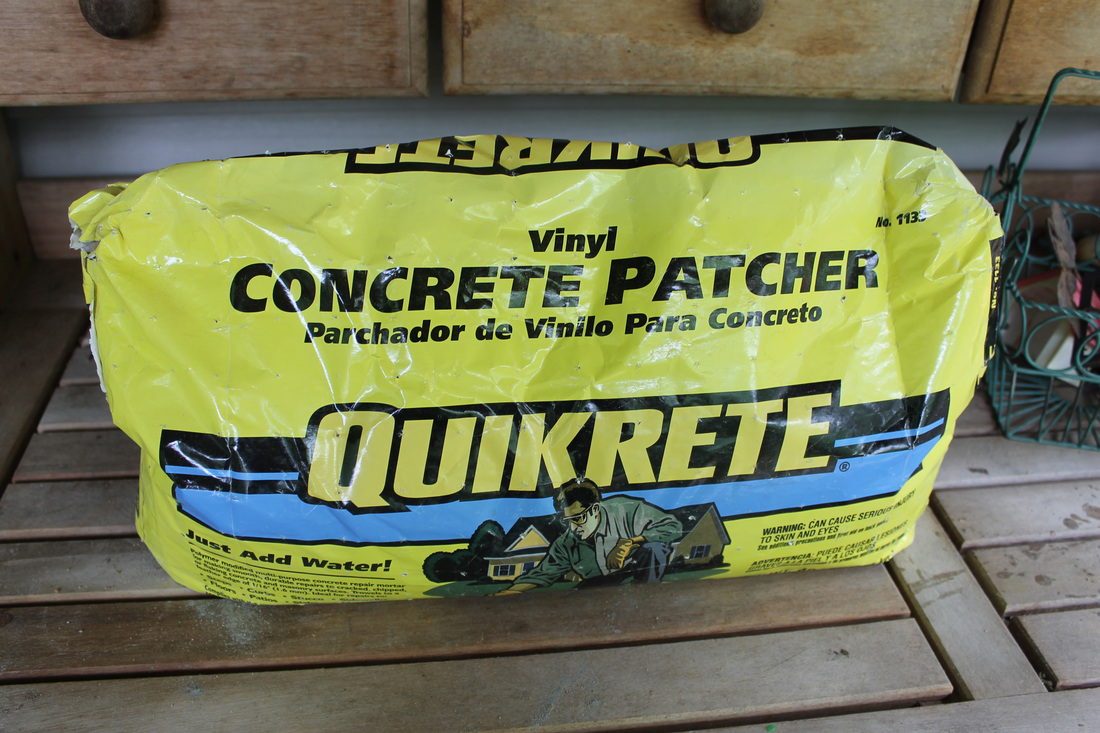
VINYL Concrete Patcher (Quikrete)
Play Sand
Tub (large enough to hold the leaf)
Wheel Barrow or Tub to mix the Quikrete
Hoe
Plastic Wrap
Plastic Gloves


Picture
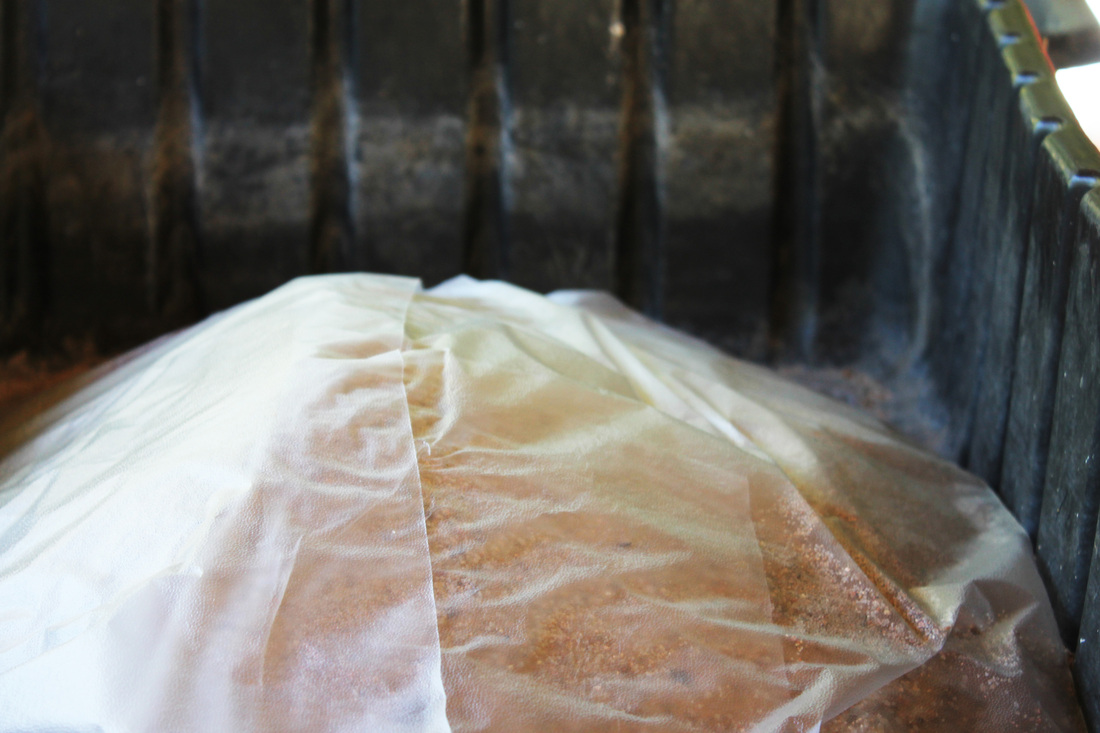
Mound the sand up to the shape you want the leaf to take on and long enough for the leaf in a tub. Cover the sand with plastic wrap.

Picture
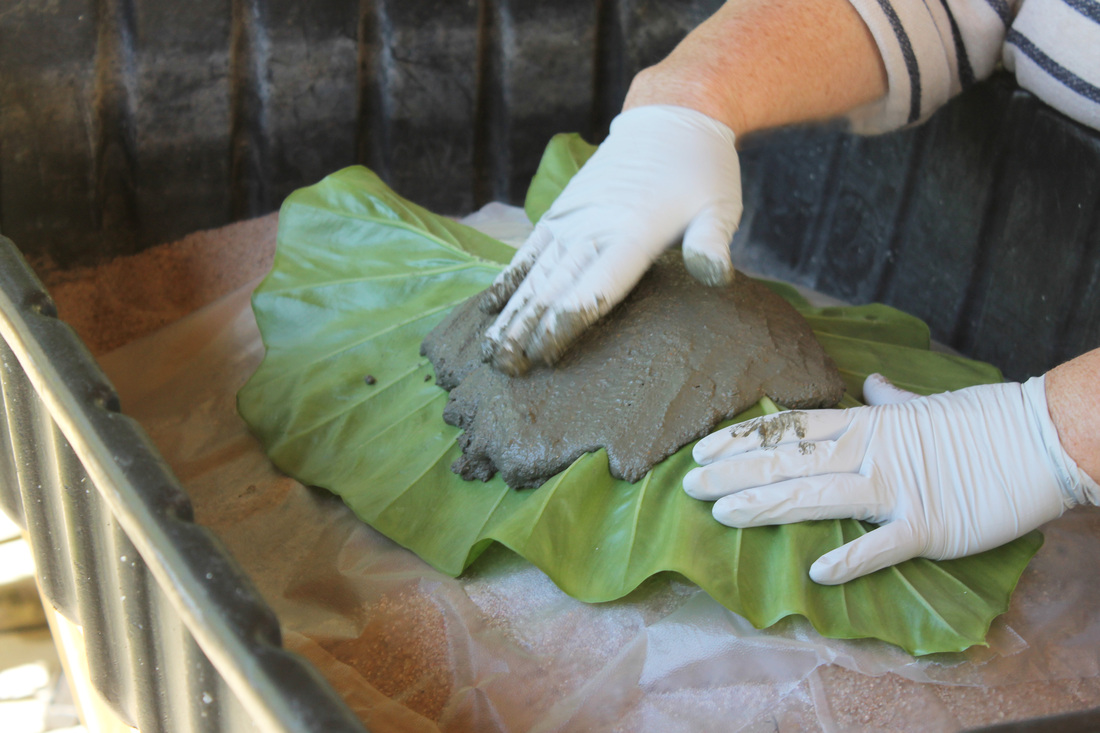
Mix the Quikrete with water extremely well with the hoe. Be sure to add plenty of water. Notice the consistency of the cement. Put the front side of the leaf on the mound of sand. Start putting the cement onto the leaf in small amounts and pat consistently to the form of the leaf.

Picture
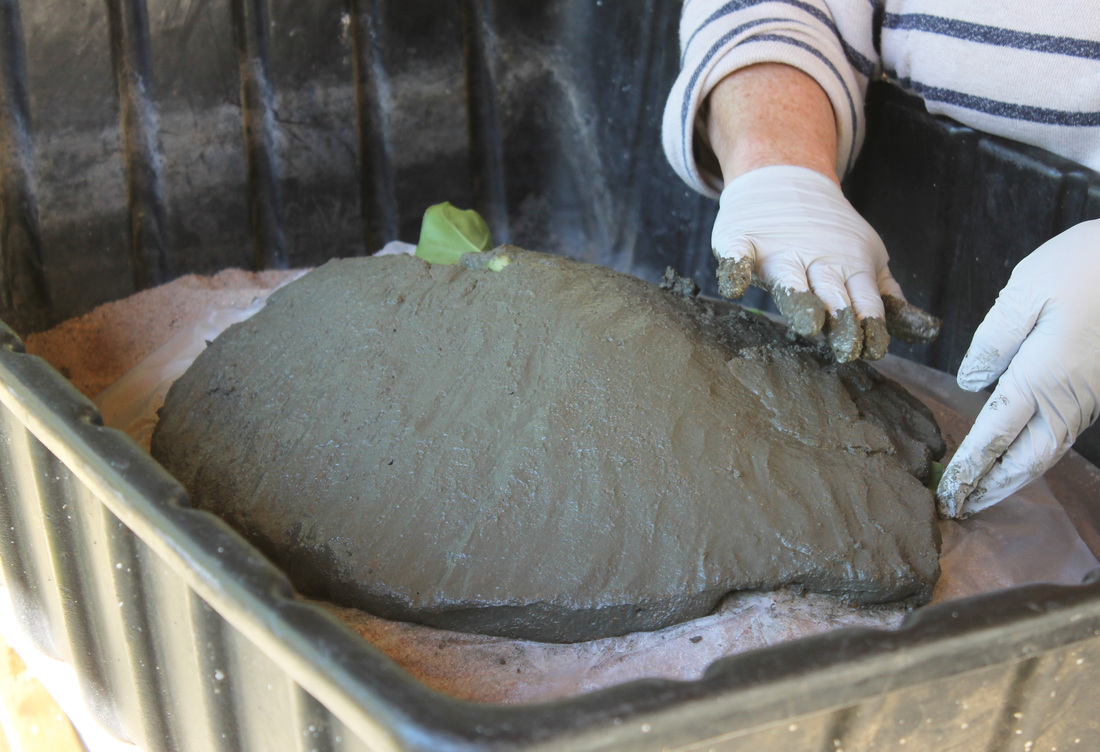
It is best not to have any folds in the leaf, but this was quite a large leaf and was almost unavoidable. Not to worry though, it will still look great!

Let DRY- do not be anxious to see your finished leaf. I like to leave them up to a week depending on the weather to dry. Lift the leaf off carefully and let cure for several weeks before painting or using them.


Picture
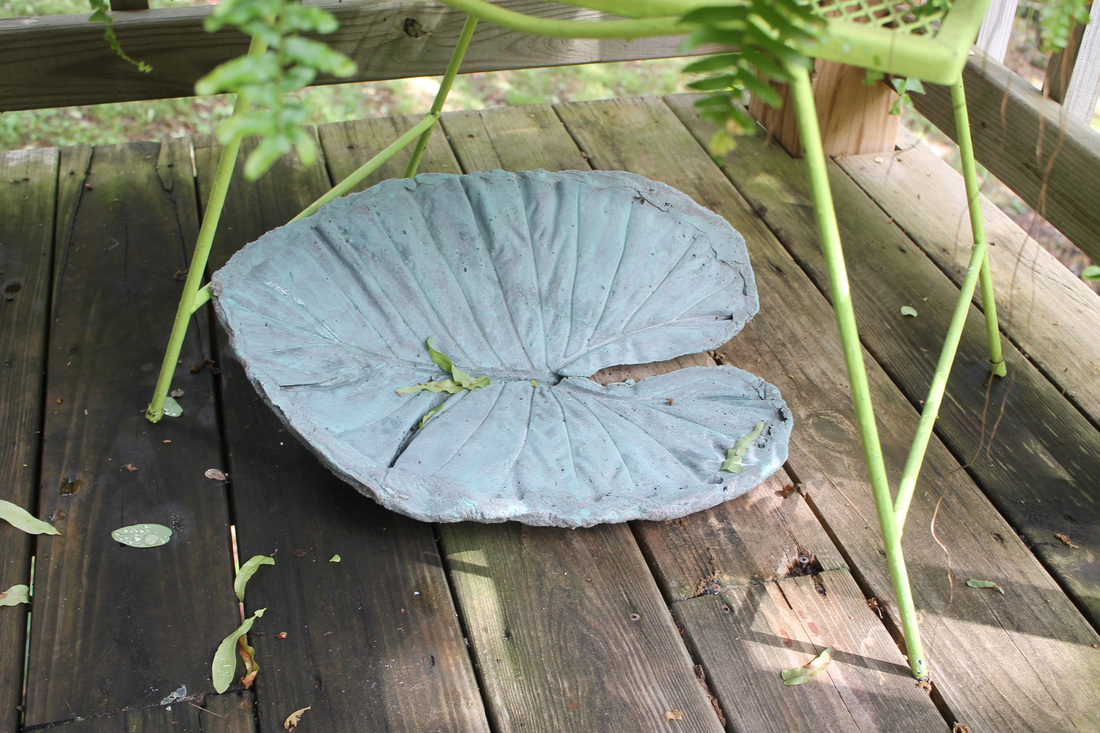
This is the leaf in the above demonstration a year later.

Sherry Krehbiel
5/30/2014 09:26:35 am

Does it take the whole bag of quick Crete to make one large leaf?

Jonni
5/31/2014 12:47:27 am

Thanks for the question. One bag of cement will do 10-15 small leaves and 4-5 big leaves.

Helen Downing
5/31/2014 11:50:56 am

Beautiful leaf shape! Did you add dye or paint to get the blue color? I have done a similar birdbath but with a rhubarb leaf. Not sure if yours is as big as that. Looks big in the picture though.

Jonni
6/1/2014 02:56:52 am

Thank you for the nice comment. I made these leaves last year and just painted them a few weeks ago. I mix together whatever left over paint I have until I get a patina color. I make the paint more like a wash, almost like water with a patina color. The biggest leaf was from a giant elephant ear, it was the biggest leaf I have ever done.

Ms Match
6/1/2014 05:19:41 am

I do mine the same way but add a few more steps--I always reinforce the big leaves with chicken wire and I always keep the wet concrete covered with a piece of plastic and spritz it lightly daily for a week, sometimes I add feet to the bottoms and sometimes I put bits of colored glass or marbles on top of the leaf before covering with cement. The biggest leaf I have used from my yard was the Paulownia tree leaf 27" x 26"

Jonni
6/1/2014 07:59:12 am

I agree with all of your extra steps. I haven't tried putting feet on it, but that is a superb idea, especially for a bird bath on the ground.

Dee
6/1/2014 07:05:37 am

Beautiful...I have been wanting to make an elephant ear concrete leaf. Wondering what would happen if you add paint to the cement mixture or food coloring to the water.

Jonni
6/1/2014 08:02:56 am

I would try it and see, I can't think that it would make a difference in it the cement setting up and curing out. Great question!

Sylvia
6/1/2014 07:24:22 am

Delightful - well demonstrated! Now I am waiting for one of my banana or bird of paradise trees to shed ;-)

Sarah
6/1/2014 07:30:51 am

This is spectacular, we live in the country so we have leaves and noticed last week my sis in law has huge elephant ears growing, I will give this a try thanks for the idea. Great job

Maria Rogers
6/1/2014 07:32:17 am

Is the side of the leaf that's facing down on the sand not covered with concrete?

Jonni
6/1/2014 08:09:27 am

The leaf's top side is on the plastic wrap. The concrete is applied to the back side only of the leaf. The back side of leaves have the more distinct veins, so the concrete is only applied to that side. Hope that helps.

Susan
6/1/2014 11:01:11 am

Thanks for the tutorial. Love the elephant ear concrete leaf. This is something I've wanted to do for years and have considered using elephant ears but didn't know until now that they would work. My question is how do you know enough water has been added to the cement? I'm guessing you are looking for a certain consistency of the cement rather than just adding a specific amount of water. Thanks

Jonni
6/1/2014 11:26:02 am

Your right, it is a guess. :-) It is better to have to much than not enough, if you don't get enough they tend to break. Work in little amounts (after mixing enough cement for one leaf) and start from the top. As you start to get to the edge of the leaf, start making an edge to finish it off. Hope this helps.

Pirate
6/4/2014 12:35:24 am

How thick do your recommend making the concrete? How would you use the chik wire for reinforcement...make a form of the leaf in wire or just use small pieces embedded in the concrete? This reminds me of Hypertufa. Thanks

Jonni
6/4/2014 02:50:44 am

The bigger leaves are usually a little thicker than the small leaves. I make mine at least an inch or more thick. I haven't used chicken wire in mine because of the vinyl in the cement. I think adding the wire is worth trying, because it definitely would make the leaves stronger. The problem I can see is making sure the wire lays down in the cement and there is going to me no way to see if the wire is completely covered on the top of the leaf. I have made Hypertufa pots in the past and they take several ingredients. The nice thing about using the vinyl cement is that is the only thing you need.


Comments are closed.

    Picture

             The Lady  behind
        Minnie's Milestones

    ​Welcome lovers of whimsy. If you love chippy paint and lots of DIY we are kindred spirits!

    BLOGLOVIN
    Featured on Hometalk.com
    Visit Minnie's Milestones by Jonni's profile on Pinterest.

    Archives

    November 2019
    September 2018
    August 2018
    July 2018
    May 2018
    April 2018
    February 2018
    January 2018
    December 2017
    November 2017
    March 2017
    February 2017
    September 2016
    June 2016
    May 2016
    April 2016
    March 2016
    February 2016
    December 2015
    October 2015
    June 2015
    May 2015
    April 2015
    March 2015
    February 2015
    January 2015
    December 2014
    November 2014
    October 2014
    September 2014
    August 2014
    July 2014
    June 2014
    May 2014
    April 2014
    March 2014
    February 2014
    January 2014
    December 2013
    November 2013


    Since
    ​2016/3/24​

    Picture
    This policy is valid from 10 April 2018
     This blog is a personal blog written and edited by me. For questions about this blog, please contact  shellknoblakegirl@gmail.com.
     This blog accepts forms of cash advertising, sponsorship, paid insertions or other forms of compensation.
     The compensation received will never influence the content, topics or posts made in this blog. All advertising is in the form of advertisements generated by a third party ad network. Those advertisements will be identified as paid advertisements.
     The owner(s) of this blog is compensated to provide opinion on products, services, websites and various other topics. Even though the owner(s) of this blog receives compensation for our posts or advertisements, we always give our honest opinions, findings, beliefs, or experiences on those topics or products. The views and opinions expressed on this blog are purely the bloggers' own. Any product claim, statistic, quote or other representation about a product or service should be verified with the manufacturer, provider or party in question.
     This blog does not contain any content which might present a conflict of interest.
    To get your own policy, go to http://www.disclosurepolicy.org
​