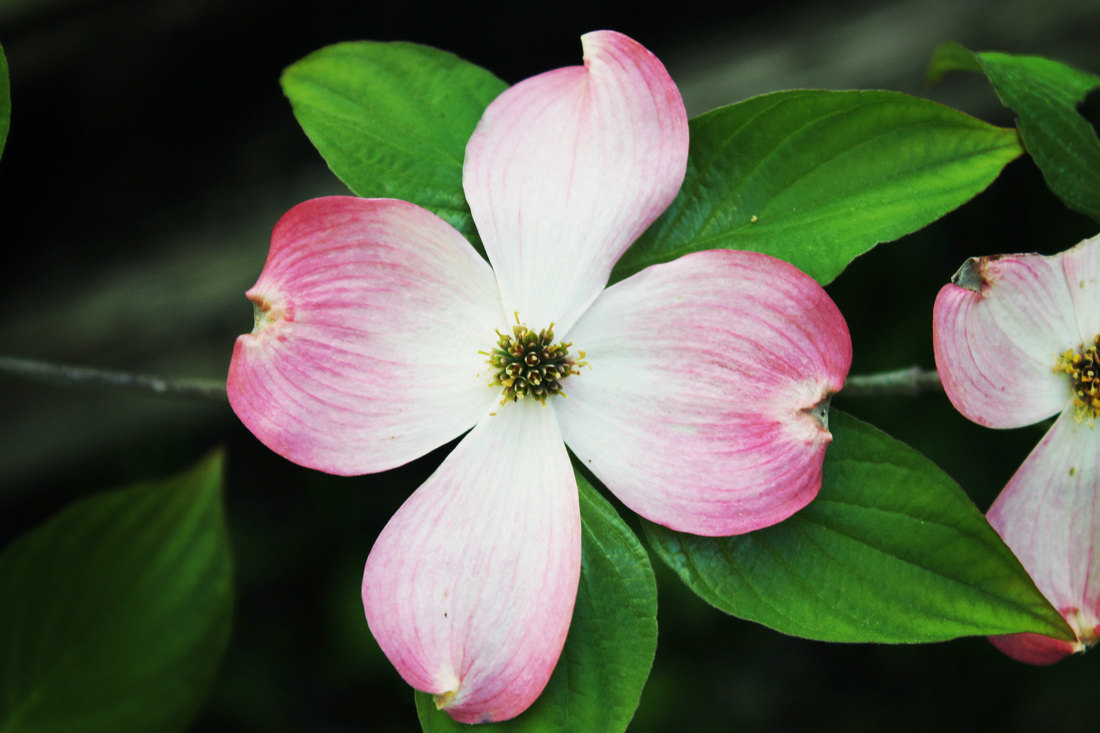
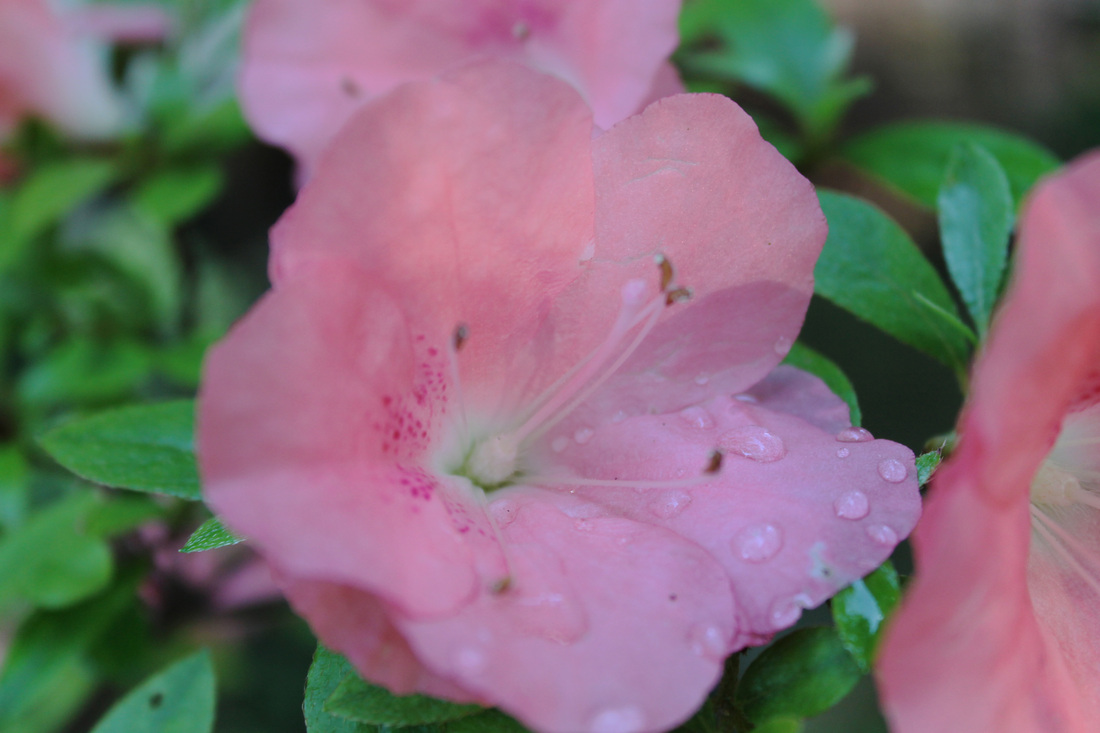
Azalea after a soft wash of rain. My azaleas have all been moved except for one, at least a couple of times. I have heard it said that a true gardener is always digging and moving plants. I will go with that thought, and not that I am crazy and eccentric. Always a work in progress! 
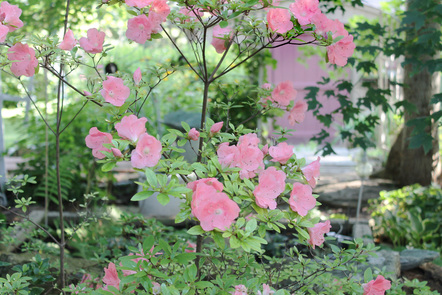
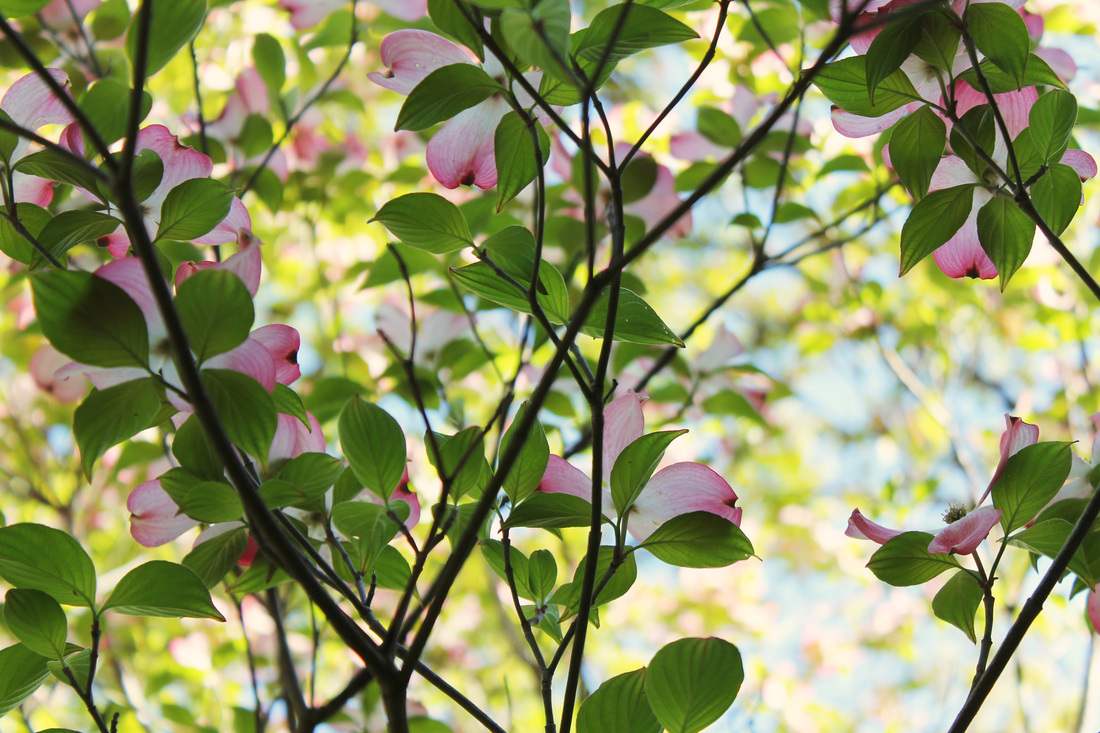
I have all my azalea's now on level 4, of my side, cottage garden, which by the way is on the north side of the house. This is the last one to bloom each year. I have azalea's that bloom from March through June. Makes my heart so happy. 
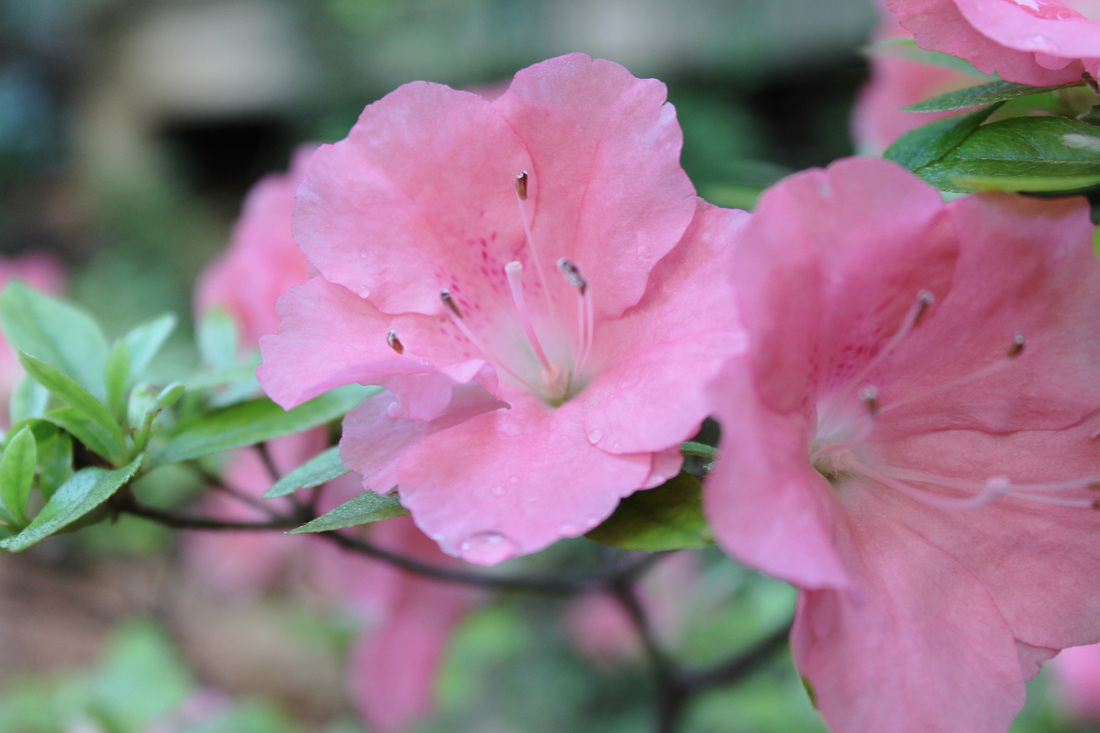
This may be my favorite azalea, but then again it depends which one is in bloom at the time.
6 Comments
The Perfect Summer Salad Cool, light and even the name sounds a little like summer. This is the perfect salad for a family reunion or after a long hot day on (in our case) the lake. You can make this salad a day ahead except for adding the whipped cream and marshmallows just before serving. Enjoy! Frog Eye Salad Recipe 1 cup acini de pepe macaroni 4 cups boiling water (add pinch of salt to water) 1 large can pineapple tidbits or crushed pineapple (in it's own juice) 1 large can mandarins oranges (whole or tidbits) 1 cup sugar 3 Tablespoons flour 3 large eggs 1 cup small marshmallows 1 9 ounce carton Cool Whip *Boil macaroni for 15- 20 minutes. Drain macaroni, wash with cool water. Set aside to continue cooling. *Drain fruit (RESERVE JUICE) *Stir together fruit and macaroni. Cool in refrigerator. *Blend, eggs, juice from fruit, flour and sugar until smooth. (I use a blender) *Cook mixture and stir frequently in microwave or stove, until mixture is thick and smooth. *Let this mixture cool in refrigerator. Cover with plastic wrap. *Fold together macaroni and fruit with the cooked mixture. *Let this set overnight or 6-8 hours. *Fold in marshmallows and cool whip just before serving. This makes a large salad, serving 8-10 people. Love, love, love Hometalk! What an awesome site!
This site is perfect for people who DIY or who want some cool ideas for home and garden projects. The perfect place to ask a question, "What is eating off my Hosta Leaves?" That is actually one of my questions on Hometalk. Hometalk asked if I would like to curate a board about, "Shabby Chic Bathroom Inspirations". I jumped at the chance! Just click on the graphic below to see all the inspirations! Grass seed came in the sack and I am glad now that my husband kept the sack. The plastic sack has a similar weave as burlap and unravels just about as bad. I cut a piece of foam that is about one inch thick to fit inside the sack and put the foam inside the sack. A zigzag stitch was used to sew up the end, nothing fancy, just put the two ends together and machine stitch. Rummaging through a cabinet in the garage, actually looking for something else, I found this plastic sack. I of course am thinking what could I make out of this? How about a garden bench cushion? The cushion is a little shorter than the length of the bench, but it is so cute on the bench, having a grass seed garden sack as a cushion. The sack does have a fairly tight weave so it should repel water somewhat. Looking through the flowers at a perfect place to sit and watch butterflies, bees and hummingbirds in one of our gardens. Joined these awesome link parties:
Two Thirty-Five Designs Have a Daily Cup of Mrs. Olson A Delightsome Life Just a Girl and Her Blog A few weeks back I did a post about Chandeliers and More Chandeliers and I said I would do a later post about where I put my beautiful new white chandelier? Yes, in my bathroom! I love the look of chandeliers in shabby chic bathrooms. White ironstone pitcher with flowers from my garden and a chippy white chair in my Shabby Chic bathroom.
I adore summertime here in the beautiful Ozarks. After this long past winter, I think it is even sweeter. So this had to be my front door quip for the summer. Living with my backyard as Table Rock Lake doesn't hurt either. At the time I am writing this, I hear boats and the laughter of families skiing. Simple, light and airy, my pretty wreath from Alexander and Mead. SWEET SUMMERTIME IN THE OZARKS! Joined this awesome link party:
I am very honored to have Anna from My Bathrooms blog as a guest post. These are the prettiest Shabby Chic bathrooms I have ever seen, this pink one is my favorite. I would love to have any of them though. Thank you Anna! Shabby chic bathroom style can be created in any bathroom! You just have to make a few changes and with minimal changes you can have your very own shabby chic bathroom. So stay with me, Anna from My Bathrooms blog as I take you through my 6 important tips for a beautiful shabby chic bathroom! 6 Beautiful Things You Can Do To Create a Shabby Chic Bathroom Source Shabby chic décor is unfailingly popular, offering both beauty and comfort set against a nostalgic and durable background. Here is how to transform your bog-standard bathroom into a shabby chic bower of delight! 1) Fade to White Source Opt for broderie anglaise curtains for bathroom window from Macrame Lace, and choose slightly faded but still beautiful fabrics for shower curtains, seat covers and floor mats: all your soft furnishings! These apparently delicate but lovely and often surprisingly durable fabrics give your bathroom instant appeal, adding in soft femininity without being clinical or unwelcoming. 2) Gentle Distress! Source Redo your cabinetry and other furniture by gently distressing it. Apply a base coat of paint and allow it to dry completely. Next, apply a secondary coat of paint in a different color paint (most shabby chic furniture plays on a pastel theme) and allow that to dry. Working carefully and gently, rub over the surfaces with sandpaper, working to remove some of the top coat, and, on the corners and edges, right through the base coat too. If you are not confident, practice on old pieces of wood so that you get the right touch for distressing your wood without ruining it or you can purchase new wood finish bathroom furniture from My Bathrooms and install them as it is for a new look, 3) Comfort Chair Source Install a wicker chair into your bathroom, preferably one painted white or in a pastel shade and possibly even lightly distressed. Not only does a chair add instant comfort to a bathroom, by giving you a place to sit for a minute and an ideal place to drape your towel or clothes if so desired, but it adds a certain shabby chic je ne sais quoi! 4) Plants It Up Source Pot plants, with covered pots (break out your old crochet hooks and some string to make your own unique pot holders!) add plenty of leafy greenery to the bathroom adding a hint of country charm to the décor. 5) Hanging Things Source Hanging baskets provide a useful way to store bathroom products even as they give a ‘country kitchen’ feel to your bathroom. Hanging plants and storage units all look great and free up loads of floor space, giving your bathroom some necessary spaciousness. 6) Pretty Details Source Add small decals, hints of embossing or embroidery, and other small feminine touches to add faded but timeless beauty to your bathroom. These little touches may not be significant in and of themselves but they add a wealth of charm and beauty to your décor that is worth much more than the sum of their parts! I had promised to show you the use of my concrete leaves, here is the first one. My Fairy Garden, using part of a leftover piece of a bird bath fountain and a concrete leaf for the roof of the fairy house. My hubby continually said, "No" to a Fairy Garden, even though if I had really wanted one I would have just made one. The opportunity arose when he brought back from the farm an old wagon that was in his family, and I said that would make a great Fairy Garden. So it began . . . . . *First I lined the wagon with two tin foil pans used for baking. I didn't want the wagon to rust through the bottom. Also, I had decided that I wanted it inside our home. Crazy you say, well after the work that I put into it along with the expense, the last thing I wanted were pesky squirrels digging it up. *Then I filled the wagon with potting soil. *Decide where your house is going to be located and what kind of house you want. There are some absolutely awesome fairy houses for sale. But, I wanted an original and this is an original and one of a kind. I started with this piece of a salvaged fountain piece from a bird bath, it has been laying around in different garden spaces for years. So it already had some natural patina. I painted the mushrooms and other items on the salvaged piece along with adding some highlights on the stones. *I tried several concrete leaves for the roof, until I found one that fit perfectly. No, I hadn't planned on making a fairy garden at the time I made the leaves. Just sort of worked out that way! The roof was then painted with a mixed color wash. There was no rhyme nor reason for the color, other than matching the house. I pretty much just fly by the seat of my pants. *I started laying packaged moss on the soil. I also tucked moss into the cracks and crevices of the house. *It doesn't show in this picture, but I did add a few pieces of live moss to the roof of the house. It does need sprayed with water often. *I dug up a rock with real moss on it for the dam of the pond. The blue rock is the water for the pond. *The troll house is from an old floral swag. The white rock is a path. *The three rocks are part of the edge of the pond. *I arranged and rearranged everything a time or two. *Start adding live plants. A miniature peace lily is in the background and in the foreground baby tears. These are actually my second set of plants. I had a miniature hosta, miniature thyme and a wire vine first. They are all outside in my garden now and hopefully will do better there. These plants are better suited as houseplants, so I do hope they do better. Several of the greenhouses in my area are caring miniature plants for fairy gardens at this time. *The green looking rock is a succulent. *The fairies, troll and added decorations were purchased at Hobby Lobby and Michaels. Have Fun Making Your Own Fairy Garden! Joined These Awesome Link Parties
Domestically Speaking Cupcakes and Crinoline 2IY Two It Yourself Fishtail Cottage A Burlap Table Runner for all seasons. I found this plain Jane table runner at Hobby Lobby, one side is brown burlap and the other side is black burlap. I used leftover material that was about 7 inches long. There was enough material for both ends of the runner once gathered into a ruffle. To Make the Ruffle: Cut leftover material in half Stitch all sides of the ruffle Stitch material with a wide stitch and gather into a ruffle. I purchased Velcro dots from Hobby Lobby. Attaching the Velcro dots to the top of the side of the burlap runner that I wanted to have show, and Velcro dots to the underside of the ruffle. I did need to use an iron on the back side of the material where the dots were attached, for the dots to adhere better. Easily detachable ruffle and the best part, it is changeable depending on your mood, season or even for a special occasion like a birthday party. It fits my extended antique, white farmhouse table perfectly! What says cottage gardening besides a Peony. A peony is the perfect Shabby Chic flower. Loose, pastel petals like a comfortable white couch with a touch of pink to bring a feeling of relaxation and comfort. We used to travel from the farm near Menlo, Kansas to Hutchinson, Kansas with peonies in a cooler, in the trunk of the car for the cemetery graves on Memorial Day. Even though my Mother had several plants, they never produced enough for all the graves, so we went to the peony farm in Hutchinson for more. I loved going. Walking up and down the rows and rows of peonies, taking in that faint, soft scent of the peonies. Sweet memories. A vintage vase full of the last of my peonies, from my garden, with a few fallen petals on the foyer table. Sitting in the corner is a piece of salvaged house trim, that I have painted white. Now to wait until next year for this beautiful flower to bloom again . . . . . . Oak Hydrangea Leaf I have been making concrete leaves for many years. I have several throughout my yard used as bird baths, fountains/spitters and garden room décor. I will share those in a later blog. I also give them as gifts to family and friends. This is going to be a step by step instructional. Lately I have had several friends interested in making their own leaves. There are many instructions of different ways to make concrete leaves, but I have found over the fifteen years of making them that mine have stood the test of time. Including ice, snow, heat and grandchildren playing with them. Start with a leaf. Big ones are nice but the smaller leaf of the oak hydrangea is my favorite. Supplies: VINYL Concrete Patcher (Quikrete) Play Sand Tub (large enough to hold the leaf) Wheel Barrow or Tub to mix the Quikrete Hoe Plastic Wrap Plastic Gloves Mound the sand up to the shape you want the leaf to take on and long enough for the leaf in a tub. Cover the sand with plastic wrap. Mix the Quikrete with water extremely well with the hoe. Be sure to add plenty of water. Notice the consistency of the cement. Put the front side of the leaf on the mound of sand. Start putting the cement onto the leaf in small amounts and pat consistently to the form of the leaf. It is best not to have any folds in the leaf, but this was quite a large leaf and was almost unavoidable. Not to worry though, it will still look great! Let DRY- do not be anxious to see your finished leaf. I like to leave them up to a week depending on the weather to dry. Lift the leaf off carefully and let cure for several weeks before painting or using them. This is the leaf in the above demonstration a year later. Zucchini and more zucchini? It won't be long before everyone is wondering what can I do with all this zucchini, right? Well before you get to that point, start thinking about making spoon bread. Or if you just have a hankering for it now, go ahead and buy a green and yellow zucchini. This is a recipe that I had forgotten about, I know for well over 15 years. It is a recipe that is truly my own, after trying several other recipes for spoon bread, I came up with my own recipe. This recipe is naturally gluten free and hardy enough to substitute for bread, vegetable and a starch for a meal. I usually bake this in a deeper dish (which I think is better) but I had a hungry crowd from playing on the lake and needed a shorter baking time. Vegetable Spoon Bread Recipe 1 medium or 2 small yellow zucchini (diced) 1 medium or 2 small green zucchini (diced) 1 hot banana pepper (diced) (any other vegetable you might like added) 1 cup cornmeal 3 cups milk 3 Tablespoon butter (melted) 2 eggs 1 teaspoon onion salt 1 teaspoon salt 1 teaspoon baking powder 1 1/2 cups shredded cheddar cheese 1-2 teaspoons Tabasco Beat eggs well in large mixing bowl. Stir in cornmeal, milk, butter, onion salt, salt and baking powder. Fold in the vegetables and cheese. Bake at 350 degrees until mixture has set slightly. Don't over bake. Joined Link Party at Just a Girl and Her Blog
My Mantra: Grit and Grace I'm a country girl at heart and you never completely take the country out of a girl. Old barn wood is beautiful to me. The wood and hinges have grit and adding white paint and placing it with an antique family cello gives it grace. Look closely at the years of hard work. New hinges and screws rusted with the following formula: * Cover hinges and screws with Clorox for 24 hrs. in bucket * Dry hinges and screws * Cover hinges and screws with apple cider vinegar and 2 Tablespoons of salt for 24 hrs. * Place in sunshine for 24 hrs. (each side for 12 hrs. each) I wanted a paint to really cover but I didn't want a sheen, so I used flat interior paint. Three coats of paint was applied. I'm loving Valspar paint. The large chandelier stencil from Designer Stencils in turquoise was next. The hinges were placed randomly. I could have distressed the whole divider at this point and may still do that, but I'm lovin it the way it is at this point. I think because it is naturally distressed in some ways anyways. My ceilings are 10 foot tall and my room divider is at least 8 foot tall. Grit and Grace (Joined Link Party with Cupcakes and Crinoline and Between Naps on the Porch and Funky Junk Interiors and Have a Daily Cup of Mrs. Olson and Delightsome Life) Did I get your attention? The morning after a beautiful rain. I was actually taking photos for another post because the lighting was fantastic this morning, I looked out the window and was in awe. The reason I love the Ozarks. Just an added note, I did not Photoshop any of these pictures, it was just this beautiful. I could hardly get my shoes on fast enough to make sure I captured the beauty of the sunshine falling on all the colors of green scenery. Yes, that is just a small piece of beautiful Table Rock Lake. This is a swing that is beyond awesome. My Dad hung one in our backyard in Burdett, Kansas for our kids. The swing came with us to the Ozarks. The seat weathered quite well for several years, but alas we had to replace the seat, but the rest is what my Dad made with so much love for his grandchildren. You can swing high enough to see over the trees and see the lake. I remember my Mother telling my husband (in Burdett) that he was swinging the kids too high. Oh ya! It goes really, really high. The grandkids love it now! Linked to A Delightsome Life This is level six of my cottage garden. The wild daisies and asparagus intertwined. It is as if the fairies played all night and then sprinkled shiny fairy dust over everything that was green. Spiderwort and daisies in the meadow going down to the lake. Joy and happiness, the meaning of a yellow rose. What is more appropriate for Mother's Day? This beauty is a climber, in fact it is on a 30 foot trellis on the side of our home, and is almost to the top. Blooming mostly in early May but will have a bloom or two in the summer. I love roses but to me this is a true cottage rose. The pale yellow, loose leaves and the rambling nature brings joy to my heart. Happy Mother's Day! Spectacular Mixed Media Art Have you been to War Eagle Craft Show? I see so many posts about craft shows in Texas and Tennessee and I am sure they are wonderful. However, just south of Eureka Springs, AR is War Eagle Cavern and down in that hollow (Ozarke Talk) is the War Eagle Craft shows. In the Fall and Spring this hollow comes alive with people looking for the latest in the art of crafting. War Eagle Cavern and mill is a destination in itself sitting near the Buffalo River. I always want to help the vendors open up their booths, or at least be their first customer. It was a spectacular day, not only the weather but in particular one booth. I fell in love with this mother and son's art! Alexander-Mead Junk-N-Roses from Catoosa, OK. Aaron mixes his own paints (lovein his colors) and everything they use to make their art is considered junk, until they take scraps of wood, lace, decoys and whatever they can find and make into beautiful art. Like Aaron and Kim of Alexander-Mead Junk-N-Roses on Facebook here and see where you can find them at their next show. Spring in the Ozarks is majestic! First we have the Redbud Trees then shortly the woods come alive with the light of the White Dogwood Tree. This is my Pink Dogwood Tree on level 3 of my side yard, I dearly love this tree and it was one of the first trees I planted when I moved to Shell Knob, MO. Do you know the legend of the Dogwood Tree? I told the legend to two of my grandchildren this year, they listened as if in awe. I am always surprised at the number of people who have never heard of this beautiful legend. I love the following poem about this legend. I can't find the author of this poem, so if anyone knows, please let me know. This is a photo of the tree looking up through the leaves to the sky. I did use Florabella Collection photo editing actions to enhance how beautiful the day was with the morning sun. Do you have an ugly director's chair sitting in the basement or closet? Bringing it out when you need extra seating or just can't throw it out yet or even better thinking I am going to do something with that ugly thing one day. Why not repurpose it to fit your décor? Shabby Chic décor in my case. Yep, this was mine. My husband had taken it to the garage/shop to sit in. They are comfortable you know. Time for a change! Time for a change! Tutorial: 1. Sand wood lightly. 2. I wanted the distressed part to be black, so I painted with black paint the parts I would distress. This included the metal part. (See pictures below.) 3. Painted with Anne Sloan white paint and then waxed with Anne Sloan white paste. 4. Distressed with sandpaper the parts I wanted distressed. The replacement seat and back I purchased at the end of the summer season at World Market for a few dollars. I did need to resize the back and seat to fit the chair, I'm not for sure that they even make this size of director's chair anymore. A true repurpose item.
Yum, pie. I can't believe I didn't like Strawberry-Rhubarb pie as a child. My Mother grew strawberries and rhubarb on our farm in Northwest Kansas. Not only that, but we had a cherry orchard, peach trees and a neighbor living in Menlo, Kansas had an apricot tree. She canned fresh peaches and froze strawberries and cherries for the winter. I can't remember my Mother's exact recipe, I am pretty sure it is very similar. I think the secret to a delicious Strawberry-Rhubarb pie is cooking the rhubarb until it looks mushy. I hate getting a hard piece of rhubarb in a pie. I always use a pie shield and use a sugar coating on top of the pie. It makes the crust crispy and beautiful. Strawberry-Rhubarb Pie Recipe 2 pints fresh or frozen strawberries (chopped) 10 oz. pkg. frozen rhubarb or around 3-4 cups of chopped fresh rhubarb 3 cups sugar (less if desired) rhubarb can be very tart though 2-3 Tablespoon tapioca red food coloring if desired pie crust of choice . . . . . . . . . . . . . . . . . . . . . . . . . . . . . . . . . . . . . . . . . . . . . . . . . . . . . . . . . . . . . . . . . . . . . . . . . Cook rhubarb in microwave with 1 1/2 cups of sugar until mushy. Add tapioca after rhubarb cooks about 2-3 minutes. Add chopped strawberries, another 1 1/2 cups sugar into the rhubarb mixture and stir. Pour into prepared crust. Place top pie crust on top of pie and brush sugar water over top of crust. Bake at 350 degrees until pie is bubbly. Enjoy. Joined These Awesome Link Parties:
The Vintage Nest I love chandeliers! I had lunch with a friend that I had not seen for sometime last week. To my surprise she has been repurposing antique and vintage chandeliers. Who knew? Norma's work is awesome! Isn't this white chandelier beautiful. Guess what? I bought it. Now where should I hang it? I will do a later post with that information, after I get it home and hang it in that perfect place. Check out Norma's shop (shared with her friend) at the Red Barn in Shell Knob, Missouri. She has many cute items, not just chandeliers. Also, Joy at the Red Barn serves lunch, cupcakes and more. Updated kitchen stools that my daughter repurposed. Loving them. Kristin took the seats off of the stools, sanded lightly and then applied six coats of white matte paint. The stools could have been distressed at this point. These stools are used by a 7 and 9 year old so she wanted them easy to clean, she sprayed the stools with Krylon triple thick crystal clear glaze. Kristin used the ink jet transfer method (here) with images from The Graphic Fairy. Kristin. . . . AWESOME JOB! Hello Spring . . . . My front door greeting is so appropriate this year as I am so welcoming Spring. I used my Cricut cutting machine and adhesive backed vinyl for the wording. The topiaries I made last Spring. I change out the topiaries using the same urns seasonally. See previous post of chalkboard for additional use of quip, "Hello Spring". This adorable shabby chic rabbit, which is over 16 years old was made by a lady from my previous hometown. Notice the detail in her work, even down to the use of the safety pin. Jan was a true artist. I love the look of a shabby chic pot, makes me think of a street in Hungary or Czechoslovakia that we visited years ago. The image of the moustache and wording came from The Graphics Fairy, whom I have mentioned before and love. I did the transfer with an inkjet printer, freezer paper and crossing my fingers. Tutorial below. TUTORIAL STEPS: 1. This pot is painted with Anne Sloan chalk paint but any interior or exterior paint will work. 2. Distress the pot with sandpaper. 3. Get an image you would like and make sure to flip the image horizontally before printing on freezer paper. I have a wide-format printer but this image would work on a regular ink-jet printer. The freezer paper must be cut precisely the size of your paper and attached to a piece of paper. I use either doubled sided tape or spray adhesive to attach together. 4. Print and carefully remove the image transfer, handling the printed side carefully as the ink will be very wet and will smudge easily. 5. Place the ink side face down on the pot or whatever you want the image on and use a brayer (spoon, ice cream stick, your finger(nail) to transfer the image. I sometimes will tape the transfer so that I can lift the image up to see if the image is dark enough, if not continue to use your brayer until you get the look you want. 6. At this point you can wipe off the paper for use again. 7. The transfer will be wet for awhile. Let it cure for a few days and then spray lightly with varnish. I have been waiting to get a five-finger fern for several months, to put in this little pot, and place in our bathroom. I actually had done the transformation of the pot last summer. My husband found this fern at Stutzmans Greenhouse outside of Hutchinson, Kansas. I was surprised when I saw the plant. He had specifically asked for a five-finger fern. I binged (googled) five-finger fern and the pictures were nothing like this fern, but this has five fingers and I love it! The internet says this is a silver brake fern. Whatever it is, it looks great in the pot. Time to change my chalkboard message. The board sits on my kitchen counter. This little quip, "Hello Spring" is perfect after such a long winter here in the Midwest of the United States. I use my cutting machine for a template for my chalkboard messages. I wish I could freehand the messages, but I do not have that artistic ability. Always make sure a new board has been seasoned by taking the side of a piece of chalk and run it over the chalkboard and then wipe off the board before use. One of our great Shell Knob beauticians, Jennifer. Jennifer works at Signature Nails and More. One of my objectives with Minnie's Milestones is to support our local Shell Knob business and give a shout out to the businesses that I personally use. Jennifer is one of several coiffeuses at Signature Nails and More. Check out my scrapbook page here, also. |
The Lady behind
|